Tetris in VBA
Overview
This project implements a simplified version of Tetris within a Microsoft Excel spreadsheet using Visual Basic for Applications (VBA) Visual Basic for Applications (VBA). To view this application, you can either download and open the Tetris.xlsm file (with macros enabled), or import the VBA code from the Tetris.bas file. Both files can be found in the project’s GitHub repository. Note that the scrollButtons_SpinDown and scrollButtons_SpinUp macros must placed in the worksheet code module.
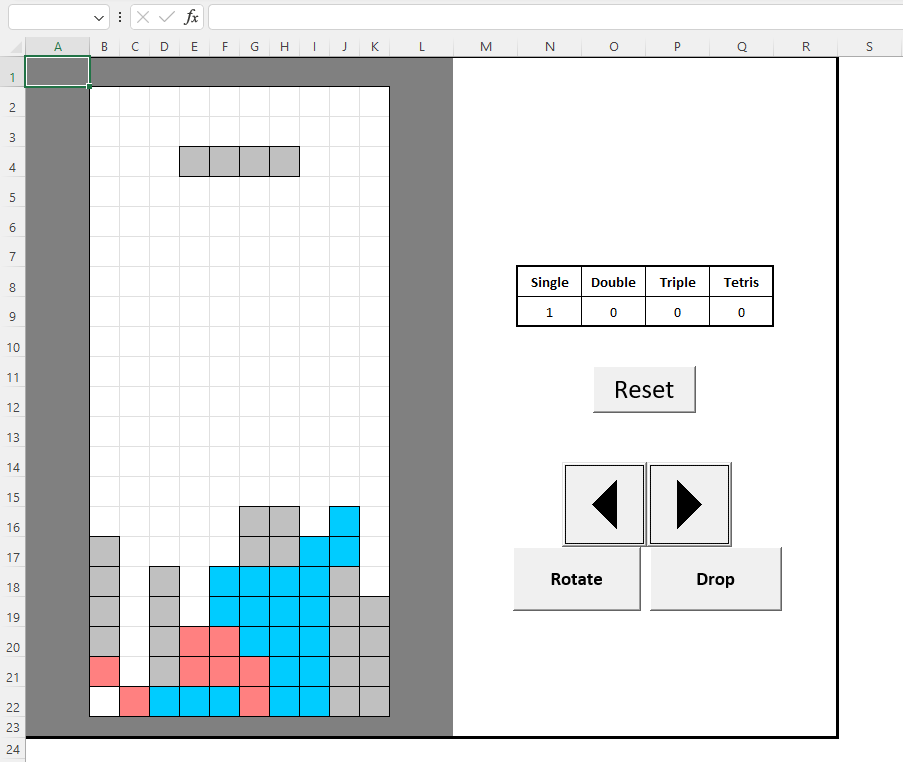
To start a game, simply hit the “Reset” button to clear the board and generate a new piece. The orientation of the piece can be set by pressing “Rotate”, while its horizontal alignment can be shifted using the left-right arrow buttons. The “Drop” button allows the piece to fall vertically downward until it collides with either the bottom of the board or a previously-placed piece.
The text below offers a comprehensive description of the program’s code. For a more informal discussion of the project, see the associated post(s).
Worksheet Structure
The Tetris.xlsm worksheet can be broadly divided into two relevant areas: the Tetris playfield on the left (columns A through L), and the user interface on the right (columns M through R). The playfield is itself further subdivided into a set of four named ranges, specifying the in-bounds area plus the left, right, and bottom walls. The interface area consists of four buttons and a table that holds the number of different line clears that have occurred throughout the game.
The player controls the placement of each piece using the buttons provided in the interface. At the start of a game and after each piece drop, a new piece is positioned at the top of the game board. The horizontal alignment of the piece can be shifted by the player using the left-right arrow buttons, which are implemented using a horizontal ActiveX scroll button control. This widget triggers the following two macros, which are activated by pressing the left and right arrows respectively:
'Moves piece to the left after button press'
Private Sub scrollButtons_SpinDown()
    Application.ScreenUpdating = False
    ShiftPiece -1
End Sub

'Moves piece to the right after button press'
Private Sub scrollButtons_SpinUp()
    Application.ScreenUpdating = False
    ShiftPiece 1
End Sub
The player can cycle through different piece orientations by clicking the “Rotate” button repeatedly, and then finally drop the piece by pressing the “Drop” button. The “Reset” button is used to start a new game by clearing the playfield and zeroing the line count table.
Starting a Game
Whenever the “Reset” button is pressed, it triggers the following macro:
Sub Reset()
    Application.ScreenUpdating = False
    startHeight = 3
    CreatePieceDict
    ClearRange Range("board")
    Range("lines") = 0
    NextPiece
End Sub
In order to prepare a new game of Tetris, the program must ensure that the following steps have been taken:
- The seven different piece types have been properly represented.
- The playfield and line counts have been cleared.
- A new, randomly-selected piece is placed at the top of the playfield.
The Reset procedure shown above accomplishes each of these tasks in turn by calling a respective subroutine. While this preparatory work is being undertaken, the screen update flag is set to false in order to improve performance and avoid visual artifacts.
The most complicated procedure called by Reset is CreatePieceDict, which defines the seven “tetromino” pieces used in standard Tetris. A portion of the code for this procedure, used to generate the “T-piece”, is reproduced below:
Dim tCoords(3, 3, 1) As Long

tCoords(0, 0, 0) = 0: tCoords(0, 0, 1) = 0
tCoords(0, 1, 0) = 0: tCoords(0, 1, 1) = 1
tCoords(0, 2, 0) = 1: tCoords(0, 2, 1) = 1
tCoords(0, 3, 0) = 0: tCoords(0, 3, 1) = 2

tCoords(1, 0, 0) = 0: tCoords(1, 0, 1) = 0
tCoords(1, 1, 0) = 0: tCoords(1, 1, 1) = 1
tCoords(1, 2, 0) = 1: tCoords(1, 2, 1) = 1
tCoords(1, 3, 0) = -1: tCoords(1, 3, 1) = 1

tCoords(2, 0, 0) = 0: tCoords(2, 0, 1) = 0
tCoords(2, 1, 0) = 0: tCoords(2, 1, 1) = 1
tCoords(2, 2, 0) = -1: tCoords(2, 2, 1) = 1
tCoords(2, 3, 0) = 0: tCoords(2, 3, 1) = 2

tCoords(3, 0, 0) = 0: tCoords(3, 0, 1) = 0
tCoords(3, 1, 0) = 0: tCoords(3, 1, 1) = 1
tCoords(3, 2, 0) = -1: tCoords(3, 2, 1) = 0
tCoords(3, 3, 0) = 1: tCoords(3, 3, 1) = 0

Set Pieces = CreateObject("Scripting.Dictionary")
Pieces.Add "t", tCoords
The piece descriptions, which consist of (x, y) coordinates for each of the four blocks, are stored in three-dimensional integer arrays with shape 4 x 4 x 2. The first dimension denotes the orientation of the piece (there are always four orientations given, even if some of them are identical), while the second dimension identifies the specific piece block. Given a specific orientation and block, the array reduces to a two-dimensional vector, which holds the desired (x, y) coordinates.
Once the pieces are properly defined, a new piece can be selected and added to the top of the playfield by calling the NextPiece procedure:
Private Sub NextPiece()
    pieceLocation = 4
    pieceOrient = 0
    Select Case Rnd() * 7
        Case 0 To 1
            pieceName = "sq"
        Case 1 To 2
            pieceName = "i"
        Case 2 To 3
            pieceName = "t"
        Case 3 To 4
            pieceName = "zl"
        Case 4 To 5
            pieceName = "zr"
        Case 5 To 6
            pieceName = "ll"
        Case Else
            pieceName = "lr"
    End Select
    PlacePiece pieceName, startHeight, pieceLocation, pieceOrient
End Sub
Here, a new piece is first selected randomly using Excel’s built-in random number generator, and then mapped (arbitrarily) to the abbreviated name of a piece. That string is then passed to the PlacePiece procedure, along with the initial piece position and orientation, which displays the new piece on top of the playfield.
Positioning a Piece
After a new piece is placed on the board, the player is free to decide its orientation and horizontal position at their own pace. As shown previously, the left-right arrow buttons will ultimately call the ShiftPiece procedure with an argument of either -1 (move left) or +1 (move right). Pressing the “Rotate” button triggers the RotatePiece macro, which cycles through different piece orientations. The code for ShiftPiece and RotatePiece is given below:
'Moves piece to the left or right at the top of the board'
Sub ShiftPiece(direct As Long)
    PlacePiece pieceName, startHeight, pieceLocation, pieceOrient, True
    If Not PieceCollision(pieceName, startHeight, pieceLocation + direct, pieceOrient) Then
        pieceLocation = pieceLocation + direct
    End If
    PlacePiece pieceName, startHeight, pieceLocation, pieceOrient
End Sub

'Rotates piece in place (roughly) at the top of the board'
Sub RotatePiece()
    Dim newOrient As Long
    Application.ScreenUpdating = False
    PlacePiece pieceName, startHeight, pieceLocation, pieceOrient, True
    If pieceOrient = 3 Then
        newOrient = 0
    Else
        newOrient = pieceOrient + 1
    End If
    If Not PieceCollision(pieceName, startHeight, pieceLocation, newOrient) Then
        pieceOrient = newOrient
    End If
    PlacePiece pieceName, startHeight, pieceLocation, pieceOrient
End Sub
Both procedures have the same logical structure. They begin by using the PlacePiece procedure to remove the current image of the piece (which is equivalent to “placing” a transparent piece in that same location), and then they perform the desired modification of the piece’s coordinates. After checking that the new coordinates do not collide with the boundaries of the playfield or with another piece, the procedure finishes by placing the repositioned piece back on the board.
The code for the PlacePiece procedure, along with its two helper functions AddBlocks and ClearRange, is given below:
Private Sub PlacePiece(piece As String, x0 As Long, y0 As Long, orient As Long, _
                       Optional blank As Boolean = False)
    Dim coords As Variant
    Dim block As Long, x As Long, y As Long
    Dim cell As Range
    If Pieces Is Nothing Then Reset
    coords = Pieces.Item(piece)
    For block = 0 To 3
        x = x0 + coords(orient, block, 0)
        y = y0 + coords(orient, block, 1)
        If (x > 0) And (y > 0) Then
            Set cell = Range("board")(x, y)
            If blank Then
                ClearRange cell
            Else
                AddBlocks cell, piece
            End If
        End If
    Next block
End Sub

Private Sub AddBlocks(cells As Range, piece As String)
    Dim color As Long
    color = PieceColors.Item(piece)
    cells.Interior.ColorIndex = color
    cells.Font.ColorIndex = color
    cells.Value = 1
    cells.BorderAround xlContinuous, xlThin, xlAutomatic
End Sub

Private Sub ClearRange(cells As Range)
    cells.Clear
    cells.Interior.ColorIndex = xlNone
End Sub
The core logic is contained in the for-loop, which iterates through the piece blocks and computes their coordinates on the playfield. It does this by taking the relative coordinates given in CreatePieceDict and adding them to the passed arguments x0 and y0, which denote the desired absolute position of the upper-left-most piece block. When the optional boolean argument is set to false, the AddBlocks procedure is called to paint the piece block into the target cell. When the argument is set to true, the cell is cleared of all formatting.
To determine if a candidate piece position leads to collisions, and therefore must be rejected, the PieceCollision and CheckCollision functions are used:
Private Function PieceCollision(piece As String, x0 As Long, y0 As Long, _
                                orient As Long) As Boolean
    Dim coords As Variant
    Dim block As Long, x As Long, y As Long
    coords = Pieces.Item(piece)
    PieceCollision = False
    For block = 0 To 3
        x = x0 + coords(orient, block, 0)
        y = y0 + coords(orient, block, 1)
        PieceCollision = PieceCollision Or CheckCollision(x, y)
    Next block
End Function

Private Function CheckCollision(x0 As Long, y0 As Long) As Boolean
    'Check left boundary collision'
    CheckCollision = Not (Intersect(Range("board")(x0, y0), Range("left")) Is Nothing)
    'Check right boundary collision'
    CheckCollision = CheckCollision Or Not _
                        (Intersect(Range("board")(x0, y0), Range("right")) Is Nothing)
    'Check bottom boundary condition'
    CheckCollision = CheckCollision Or Not _
                        (Intersect(Range("board")(x0, y0), Range("bottom")) Is Nothing)
    'Check piece collision'
    CheckCollision = CheckCollision Or (Range("board")(x0, y0) = 1)
End Function
The PieceCollision iterates through the piece blocks and calls CheckCollision at each coordinate. The latter function checks to see if the block cell overlaps with any of the cells corresponding to the left, right, or bottom boundaries of the playfield, or if it overlaps with an already occupied cell on the board. If any of these intersections occur, PieceCollision will return true and the proposed piece position will be rejected.
Dropping a Piece
Once the player has positioned a piece to their satisfaction, they can drop it into place by pressing the “Drop” button. This triggers the DropPiece procedure, which determines how the piece should ultimately land in the playfield:
Sub DropPiece()
    Dim height As Long
    Application.ScreenUpdating = False
    PlacePiece pieceName, startHeight, pieceLocation, pieceOrient, True
    For height = startHeight + 1 To 24
    If PieceCollision(pieceName, height, pieceLocation, pieceOrient) Then
        height = height - 1
        Exit For
    End If
    Next height
    PlacePiece pieceName, height, pieceLocation, pieceOrient
    ClearLines
    NextPiece
End Sub
The procedure works by incrementally lowering the height of the piece and checking for collisions. When a collision is detected, either with another piece or at the bottom of the playfield, the procedure calls PlacePiece at the height just before the collision was detected.
Once the piece is placed in its final position, the application must determine whether any rows of the playfield have been filled, and then update the playfield appropriately. This is done using the ClearLines and UpdateScore procedures:
Private Sub ClearLines()
    Dim height As Long
    Dim board As Range: Set board = Range("board")
    Dim subrange As Range
    Dim lineCount As Long: lineCount = 0
    For height = 1 To 22
        If WorksheetFunction.Sum(Range(board.cells(height, 1), board.cells(height, 10))) = 10 Then
            lineCount = lineCount + 1
            Range(board.cells(1, 1), board.cells(height - 1, 10)).Copy
            Range(board.cells(2, 1), board.cells(height, 10)).PasteSpecial xlPasteAll
            Range("A1").Select
        End If
    Next height
    UpdateScore lineCount
End Sub

Private Sub UpdateScore(lineClears As Long)
    If lineClears > 0 Then
        Range("lines")(1, lineClears) = Range("lines")(1, lineClears) + 1
    End If
End Sub
The ClearLines procedure exploits a hidden feature of the playfield, in which occupied cells are given a value of 1 using a font color identical to the background cell color. As a result, filled rows can be found by simply adding the values of all cells in each row and checking if the sum equals 10. When a row is found to be filled, it is removed by copying the portion of the playfield above the row and pasting it one row lower. The total number of lines cleared in a single call to ClearLines is used to update the table of line counts via the UpdateScore procedure.