Tetris Emulation with OpenGL
Overview
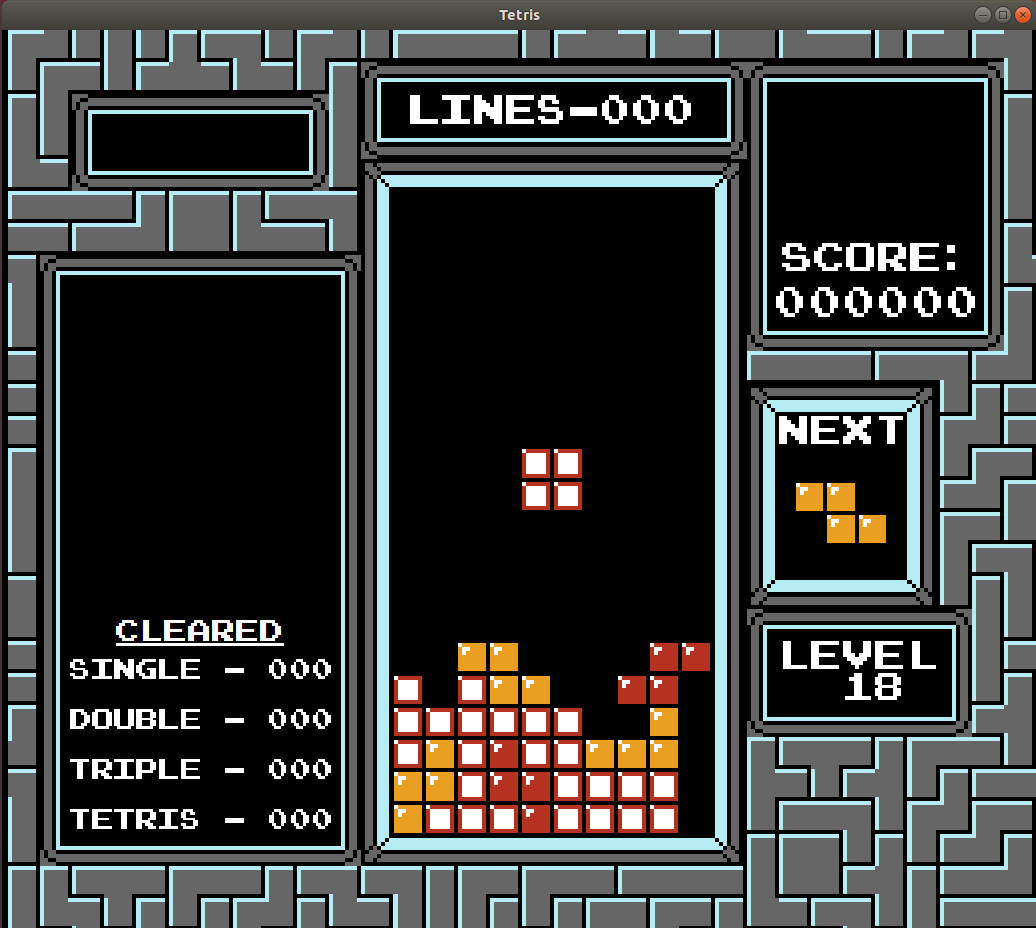
This project seeks to emulate the version of Tetris played on the Nintendo Entertainment System (NES). Released in 1989, NES Tetris was one of the first mass-market editions of the game, and helped to greatly expand its popularity. While a more standardized set of rules now exists for modern Tetris releases, earlier versions were given a large amount of freedom in how they implemented many aspects of the game, from overall piece speed and drop mechanics to the randomization and scoring algorithms. My goal here is to recreate all of these details in an application that can run on a desktop computer.
The program can be compiled on Linux (tested specifically on Ubuntu 18.04) by following the instructions on the project’s GitHub page. The only external dependency is GLFW, an open-source library that interfaces with OpenGL and handles user inputs. The following sections provide a broad outline of the emulator’s underlying code, which is written in C++ and uses OpenGL to render graphics. The source code itself is also heavily commented, and comprehensively explains the emulator’s finer details.
General Structure and Game Loop
The emulator’s source files (in the src directory) are broadly divided into code that runs the game logic (in the game subdirectory) and code that generates the game’s graphics (in the graphics subdirectory). The third subdirectory glad contains a single file glad.c that was generated using the glad OpenGL loading library, and is used to find the correct OpenGL functions at runtime.
The emulator is initialized by the main function in main.cpp, which performs the following setup operations:
- Create the game window and its associated OpenGL context.
- Parse user-provided information about the game mode, starting level, and asset directory.
- Initialize handlers for user inputs and graphics rendering.
- Create a new game object and connects it to the handlers.
The code for these three steps is given below (the handlers will be discussed in more detail later):
// 1. Create the game window and assign to it an OpenGL context loaded by GLEW
int windowHeight = 899, windowWidth = 1035;
GLFWwindow* window = glfwCreateWindow(windowWidth, windowHeight, "Tetris", nullptr, nullptr);
glfwMakeContextCurrent(window);
gladLoadGL();

// 2. Extract image/shader parent directory, game type, and level from command line
const std::string drawingLocation = argv[1];
const std::string mode = (argc > 2) ? argv[2] : std::string("nes");
const int startLevel = (argc > 3) ? std::stoi(argv[3]) : 0;

// 3. Create the keyboard/mouse input handler and the OpenGL drawer
InputHandler inputs{window};
BoardDrawer drawer{drawingLocation}

// 4. Create game object and assign variables to graphics handler
NESTetris game{startLevel};
game.assignInput(inputs);
drawer.assignGrid(game.displayGrid);
drawer.assignLevel(game.dynamic["level"]);
drawer.assignLineCount(game.board.lineCount);
drawer.assignlineTypeCount(game.board.lineTypeCount);
drawer.assignNextPiece(game.nextPiece);
drawer.assignScore(game.dynamic["score"]);;
After completing these initialization steps, the main function then begins to execute the game loop, which processes each frame. The loop is divided into two stages, one which handles the game logic and another that handles graphics:
double engTime = 0;
double rendTime = 0;
const double engSecs = 1 / 60.1; // Recipricol of FPS
const double rendSecs = 1 / 60.1; // Recipricol of FPS

// Run the main game loop, with game frames run and drawn seperately
while (!glfwWindowShouldClose(window)) {
    double newTime = glfwGetTime();
    if (newTime - engTime >= engSecs) {
        game.runFrame();
        engTime = newTime;
    }
    if (newTime - rendTime >= rendSecs) {
        drawer.drawFrame();
        glfwSwapBuffers(window);
        rendTime = newTime;
    }
    glfwPollEvents();
}
The three key functions in the loop are game.runFrame, drawer.drawFrame, and glfwPollEvents. The first two function calls have many effects that will be examined in subsequent sections, but glfwPollEvents simply processes GLFW events that are in the queue, such as user inputs. This function is executed as frequently as possible to minimize input lag, while the game.runFrame and drawer.drawFrame functions are called with specific frequencies based on the desired frame and refresh rates.
Running a Frame
The NES console runs at 60.1 frames per second (FPS), which means that the game logic is executed approximately once every 17 milliseconds. In the emulator, each frame is marked by a call to game.runFrame, which is a method of the master game object that holds all methods, attributes, and sub-objects related to gameplay. The game.runFrame method is itself a fairly simple function, tasked with deciding how the frame should be processed:
void NESTetris::runFrame()
{
    setCommands();
    if (commands["reset"]) {
        resetGame();
    }
    if (flags["frozen"] == true) {
        runFrozenFrame(); // Run during the entry delay
    }
    else {
        if (!filledRows.empty()) {
            runClearFrame(); // Run during line clears
        }
        else {
            runActiveFrame(); // Run during regular play
        }
    }
    resetBool(commands);
    ++ dynamic["totalFrames"];
}
The “frozen” and “clear” frames are both fairly similar in that they halt play when executed, which slows down the game and offers some respite for the player. An “active” frame is the type of frame that is run during normal gameplay, and consists of the following operations:
- Process commands from the input handler.
- Apply gravity to the current piece.
- Check if the piece has landed and if any rows have been filled.
The first operation is done via the setCommands function, which takes key presses logged by the input handler and translates them into game actions. A portion of the setCommands is reproduced below, focusing on horizontal movement of the current Tetris piece:
    // Left key:
    if (keyMap["left"] == "pressed" && keyMap["right"] == "off") {
        commands["doLeft"] = true;
    }
    if (keyMap["left"] == "held") {
        commands["leftDAS"] = true;
        }

    // Right key:
    if (keyMap["right"] == "pressed" && keyMap["left"] == "off") {
        commands["doRight"] = true;
    }
    if (keyMap["right"] == "held") {
        commands["rightDAS"] = true;
    }
As can be seen from the if statements, the mapping between a key press and a command can vary based on the present and past state of other keys. Once the commands are processed, the emulator then checks to see if the piece needs to be shifted downward by gravity. The following code excerpt shows the logic which implements this process:
if (!flags["dropDelay"] && dynamic["dropFrames"] >= dynamic["gravity"]) {
        dynamic["dropFrames"] = 0;
        currPiece->translate(-1, 0);
    }
    else {
        ++ dynamic["dropFrames"];
        displayPiece();
    }
The emulator counts the number of frames that have occurred since gravity was last applied, and compares this to the target rate (which depends on the game level). If the specified number of frames have elapsed, then the piece coordinates are all translated one unit downward. Otherwise, the frame counter is incremented and will be checked again on the next active frame.
As its final step, an active frame will check whether the current piece has collided with an existing piece and/or the bottom of the playfield. This is done by querying the game’s grid object (which stores the location of all existing pieces) using the coordinates of the current piece. If a collision is detected, then the last downward shift is reversed and the emulator checks whether any rows are filled. This is all handled in the following code block:
if (board.grid.collisionCheck(currPiece->coords)) {
    ++ dynamic["move"];
    currPiece->translate(1, 0);
    setEntryDelay();
    displayPiece();
    filledRows = displayGrid.getFilledRows();
    board.placePiece(*currPiece);
    if (!filledRows.empty()) {
        updateScore();
        checkLevel();
    }
    else{
        flags["frozen"] = true;
    }
}
If at least one row has been filled, then those blocks will be cleared in subsequent frames. If not, a set of “frozen” frames will be run in order to delay the arrival of a new piece and give the player time to reorient themselves.
Displaying the Game
The graphical portion of the emulator is handled by the drawer object, whose drawFrame method is called in the game loop during each rendering cycle. This function performs the following tasks:
- Draw the pieces that have been placed in the playfield.
- Display a preview of the piece that will appear after the current one is placed.
- Write text that gives the total line count and the number of different line clears.
- Write text showing the score and current level.
These operations prepare the new display configuration in a buffer, which is then applied to the emulator window by calling the glfwSwapBuffers function at the end of each rendering cycle.
To draw the Tetris pieces, the emulator extracts the coordinates and color of each block from its underlying grid object and then draws them:
void BoardDrawer::drawPieceBlocks() {
    for (auto& rowColIndex : gridSource->getFilledBlocks()) {
        int row = rowColIndex[0];
        int col = rowColIndex[1];
        int index = rowColIndex[2];
        int texture = blockTextures[pieceTexMap[index]];
        const double x0 = playFieldPos[0] + col*blockWidthSpacing;
        const double x1 = playFieldPos[0] + (col + 1)*blockWidthSpacing;
        const double y0 = playFieldPos[5] - row*blockHeightSpacing;
        const double y1 = playFieldPos[5] - (row + 1)*blockHeightSpacing;
        std::vector<double> vertices = {
        x0, y1,      0, 1,
        x1, y1,      1, 1,
        x0, y0,      0, 0,
        x1, y0,      1, 0};
        drawSquare(vertices, texture);
    }
}
The blockWidthSpacing and blockHeightSpacing attributes of the drawer object are computed based on the size of the emulator window, and serve to transform the grid coordinates to pixel coordinates. These new coordinates are then passed to the drawSquare function, which ultimately sends them to an OpenGL shader for rendering. A similar process is used to generate the piece preview, except that those blocks are drawn in their own separate portion of the emulator window.
For generating text, the emulator uses characters defined by a bitmap stored in the assets folder (which also holds textures for the piece blocks and playfield background). When the emulator needs to render a specific character, it looks up the corresponding pixel coordinates in the bitmap image file and then passes that segment to the shader. The most complicated part of this process is positioning each character in the target string, which is done by the following method:
std::vector<std::vector<double>> TextDrawer::getTextVertices(
    std::string text, double x0, double x1, double y0, double y1)
{
    // Get horizontal and vertical spacing
    double horiz_spacing = (x1 - x0) / text.length();
    // 106/94 is the aspect ratio of the font
    double vert_spacing = horiz_spacing*(94.0/106.0);
    // Text is vertically centered in the rectangle
    double vert_offset = (y1 - y0 - vert_spacing);
    double y0char = y0 + 0.5*vert_offset;
    double y1char = y1 - 0.5*vert_offset;

    // Iterate through each character and generate the four vertices to use when drawing
    double charCount = 0;
    std::vector<std::vector<double>> textVertices;
    for (auto& c : text) {
        // The x-coordinates of each character are generated from the horizontal spacing
        double x0Char = x0 + horiz_spacing*charCount;
        double x1Char = x0Char + horiz_spacing;
        // Get relative texture coordinate by dividing by total bitmap width
        double x0Tex = charTexCoords[c][0] / 4066.0;
        double x1Tex = charTexCoords[c][1] / 4066.0;
        // The text is drawn in a line, so the y-coordinate is uniform across all characters
        std::vector<double> charVertices{
            x0Char, y1char,  x0Tex, 0,
            x1Char, y1char,  x1Tex, 0,
            x0Char, y0char,  x0Tex, 1,
            x1Char, y0char,  x1Tex, 1};
        textVertices.push_back(charVertices);
        ++charCount;
    }
    return textVertices;
}
This function takes a string of text and a set of coordinates marking the four corners of a rectangle and determines the amount of space that can be allotted to each character. The basic approach is to divide the horizontal length by the number of characters to get the width-per-character, then multiply this spacing by the height/width ratio of the font to get the vertical spacing. The text is then iterated through and each character is assigned its position and texture coordinates.
Using the getTextVertices method, the process for writing text is fairly consistent. First, a string is generated that contains the desired text. Then, this string and the coordinates describing its intended position are passed to getTextVertices, which returns the character-level coordinates. Finally, each of the characters is individually passed to the OpenGL shader via drawSquare. The following example shows the code used to generate text for the total number of lines cleared:
void BoardDrawer::drawLineCount()
{
    if (lineCountSource) {
        int x0 = 408, x1 = 695;
        int y0 = 64, y1 = 95;
        std::string lineCountRaw = std::to_string(*lineCountSource);
        std::string lineCountStr = std::string("lines-") +
            (lineCountRaw.size() < 3 ?
                std::string(3 - lineCountRaw.size(), '0') + lineCountRaw
                : lineCountRaw);
        auto textVertices = textDrawer.getTextVertices(lineCountStr, x0, x1, y0, y1);
        for (auto& charVertices : textVertices) {
            drawSquare(charVertices, fontTexture);
        }
    }
}
The desired string, which always has the form “Line-XXX”, is constructed using a pointer to the game object’s line count variable. The output coordinates are based on the layout of the playfield, and therefore do not change.
Handling Inputs
In order for someone to actually play a game of Tetris using the emulator, it must have a way of detecting user inputs. This is provided by the InputHandler object, which interfaces with the GLFW library to detect specific events like a mouse click or key press. The handler first converts the GLFW event variable into a string which describes the source of the input event, and then determines whether the event was newly-triggered or instead “held” (i.e. had already been triggered in the previous event poll). This logic is all handled in the getStates method of the InputHandler class:
std::map<const std::string, std::string> InputHandler::getStates(
    std::vector<std::string> keyNames)
{
    std::map<const std::string, std::string> states;
    for (auto keyName : keyNames) {
        auto keyIntItr = keyToInt.find(keyName);
        std::string state;
        if (keyIntItr != keyToInt.end()) { // Only proceed if key name is valid
            int key = keyIntItr->second;
            if (actionMap[key] == GLFW_RELEASE) {
                prevQueried[key] = false;
                state = "off";
            }
            else if (actionMap[key] != GLFW_RELEASE) { // True for GLFW_PRESS / GLFW_REPEAT
                if (!prevQueried[key]) {
                    prevQueried[key] = true;
                    state = "pressed";
                }
                else if (prevQueried[key]) {
                    state = "held";
                }
            }
        }
        else { // If no matching key is found, return empty string to indicate failure
            state =  "";
        }
        states[keyName] = state;
    }
    return states;
}
This function returns the state of the desired keys, which is “off” if the key is not pressed, “pressed” if the key has just been pressed, or “held” if the key is held down. In order to make this feedback instantaneous, the input handler records whether it has been previously queried about a particular key while that key is being pressed (i.e. while GLFW has registered a press but not yet a release). If the key had previously been queried, the function returns the state “held” rather than “pressed”. After the event states have been resolved, they can be used to configure commands that will be executed when a frame is processed.